Making the Parts That No Longer Exist · Volume 1
Making the Parts That No Longer Exist — Vol 1: What You Can Honestly Make
Teletype Corporation stopped making these parts decades ago. Some of them you can genuinely fabricate on a hobby bench; some of them a 3D printer will destroy your machine trying to replace. The skill is knowing which is which before you cut.
1.1 The honest starting position
Teletype Corporation is gone. Western Electric is gone. The tooling is gone, the drawings survive only as scans, and the last new Model 15 part left a stockroom before I was born. What is left is a finite and shrinking pool of new old stock, a healthy trade in parts machines, and a small number of dealers with real inventory — “Mr RTTY” is the name that comes up over and over on Greenkeys, and W2JC has been distributing new-old-stock supplies for years.
But the pool only shrinks. Sooner or later every restorer meets a part that cannot be bought, and the question becomes: can I make this?
The answer is more often yes than people expect, and less often yes than a 3D printer’s owner would like. This volume is about drawing that line honestly, because getting it wrong is not a wasted afternoon — a fabricated part that fails inside a running teletype takes other parts with it, and the ones it takes are usually the ones you cannot make either.
1.2 The first rule: understand the duty before you copy the shape
The mistake I see most is treating a replacement part as a geometry problem. It is not. It is a duty problem. Two parts of identical shape can have completely different requirements, and the shape tells you nothing about which is which.
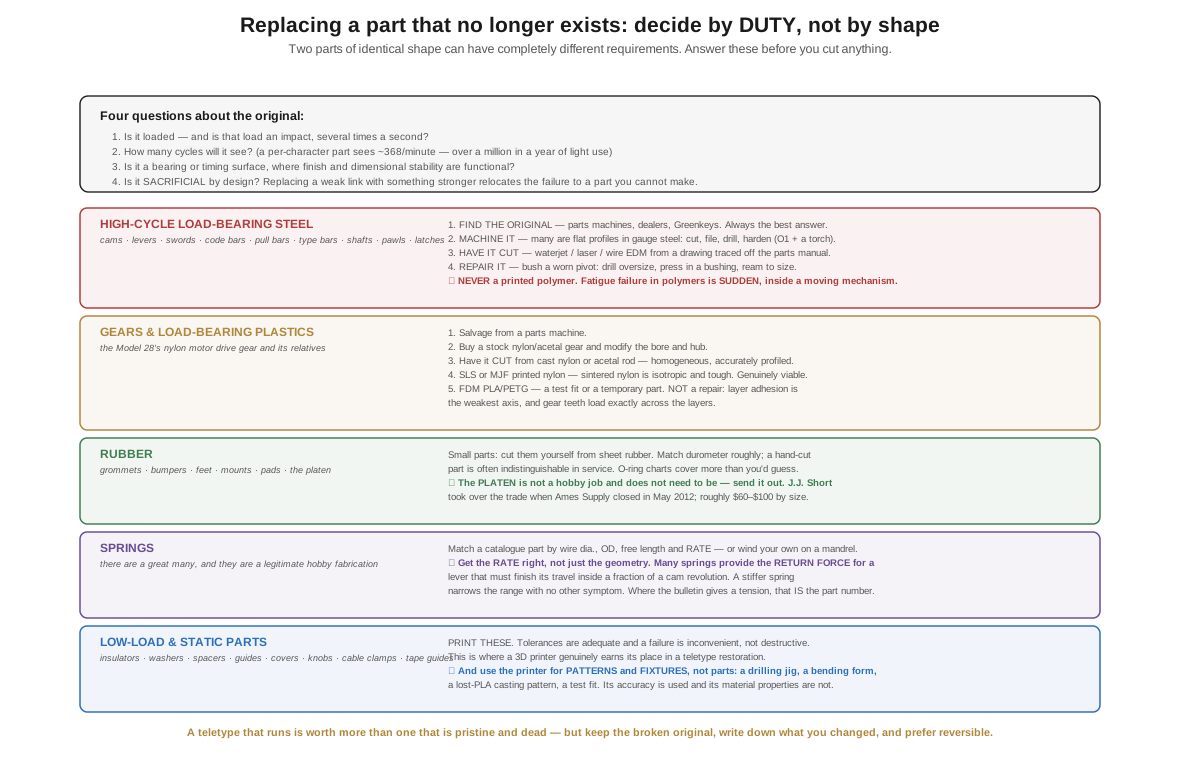
Before you fabricate anything, answer four questions about the original:
- Is it loaded, and how? Static clamping load, or an impact several times a second?
- How many cycles will it see? A Teletype at 60 WPM cycles its main shaft about 368 times a minute. Run it an hour a week for a year and a per-character part has seen well over a million cycles. This is a fatigue problem, not a strength problem — a part can be far stronger than the peak load and still fail, because polymers under repeated sub-critical load initiate micro-cracks that propagate until sudden failure, and because hysteretic heating softens them from inside.
- Is it a bearing or timing surface? If another part slides, pivots, or indexes against it, its finish and dimensional stability are functional, not cosmetic.
- Is it sacrificial by design? Some parts in any machine are meant to be the weak link. Replacing one with something stronger relocates the failure to a part you cannot replace, which is strictly worse.
1.3 Category 1 — rubber: the most-needed and most-doable
Rubber is the least survivable material in the machine and, happily, one of the easiest to address.
Small rubber parts — grommets, bumpers, feet, mounts, pads. These are genuinely a hobby job. One restorer simply bought sheet rubber and cut replacements by hand for the perished parts in his Model 28. Match the durometer roughly, get the thickness right, and a hand-cut part is often indistinguishable in service. For anything O-ring shaped, the standard metric and imperial O-ring size charts cover more vintage machinery than you would guess — measure the groove, not the perished remains.
The platen is not a hobby job, and you do not need it to be. A platen is a steel core covered in a precisely ground layer of rubber at a specific hardness. The hardness is functional: too soft and the type mushes, too hard and it cuts the paper and hammers the type faces. Getting it right requires bonding, curing, and centreless grinding to a tolerance, and no reasonable home shop does that.
Instead, send it out. There is a live commercial trade in this, serving the typewriter-collecting world, which overlaps ours completely. J.J. Short Associates took over platen recovering after Ames Supply — which had served the typewriter and office-equipment industry for over a century — abruptly closed in May 2012, and they now also recover feed rollers, bail rollers, and finger rollers. Reported pricing runs roughly $60–$100 depending on platen size. You ship them the core; they send it back covered and ground.
That last point is the general lesson: the correct answer to “I cannot make this” is sometimes “somebody else already does.” A hard platen makes a machine print badly and is one of the most common reasons a restored teletype disappoints, and a hundred dollars fixes it permanently.
1.4 Category 2 — springs
Teletypes contain a great many springs, and springs are a legitimate hobby fabrication.
- Tension and compression springs in common wire gauges are stock items. The catalogue houses list thousands by wire diameter, outside diameter, free length, and rate, and matching a broken spring against a catalogue is usually quicker than winding one.
- Winding your own is entirely practical — music wire on a mandrel in a lathe, or by hand with a drill and a guide. This is a genuinely useful skill for oddly-sized springs.
- 🔴 Get the rate right, not just the geometry. This is the trap. A spring that looks right but is stiffer than the original will change the machine’s timing, because many springs in a teletype are not holding things together — they are providing the return force for a lever that must complete its travel within a specific fraction of a cam revolution. Fit a stiffer spring and you can narrow the range without any other symptom, which is a maddening fault to chase. Where the bulletin gives a spring tension specification — and it very often does, in ounces, measured with a spring scale at a stated point — that specification is the part number. Match the force, then worry about the wire.
1.5 Category 3 — fibre, nylon, and phenolic parts
Here is where it gets interesting, and where 3D printing finally has a legitimate role.
Teletypes use non-metallic parts deliberately: fibre and phenolic insulators and washers, nylon gears in some drive trains — the Model 28’s main drive gear from the motor is nylon — and various bushings and spacers. These were chosen for quietness, for electrical insulation, or for controlled wear against steel.
Insulators, washers, spacers, guides, covers, knobs, cable clamps, tape guides, index plates. Print these. They are low-load or static, the printer’s tolerances are adequate, and a failure is inconvenient rather than destructive. This is where FDM and resin printing genuinely earn their place in a teletype restoration, and a modest library of printed spacers and guides has saved more than one machine.
Nylon gears in the drive train are a different matter, and I want to be careful here. A printed gear is anisotropic — layer adhesion is the weakest axis, and gear teeth are loaded precisely across the layers on an FDM part. It is also dimensionally approximate in a way that matters enormously for gears, where profile errors become noise, vibration, and accelerated wear on the steel gear it meshes with. A printed gear failing is not just a printed gear failing.
There is a real spectrum of options, and printing sits near the bottom of it:
Table 1 — There is a real spectrum of options, and printing sits near the bottom of it
| Approach | When it is right |
|---|---|
| Salvage from a parts machine | Always the first answer. Cheapest, correct, original. |
| Buy stock nylon/acetal gear and modify the bore/hub | Excellent when the tooth count and module match a commercial part |
| Have it cut from cast nylon or acetal rod by a machine shop or a hobbyist with a dividing head | The right answer for a real drive gear. Cut gears are homogeneous and accurately profiled. |
| SLS or MJF printed nylon | Genuinely viable — sintered nylon is isotropic and tough, unlike FDM. Not cheap, but real. |
| FDM printed PLA/PETG gear | A temporary part, or a low-load one, or a test fit. Not a repair. |
Use a printer to make a pattern or a fixture, not the part. This is the technique that is genuinely underused. Print the shape to check fit before you cut metal. Print a drilling jig so a hand-made steel part gets its holes in the right place. Print a form for bending sheet metal. Print a pattern for casting, in aluminium or bronze, using lost-PLA or as a pattern for a sand mould. In every one of those cases the printer’s weaknesses — poor fatigue life, anisotropy, creep — do not matter at all, because the printed object never sees service. Its dimensional accuracy is used and its material properties are not, which is exactly the right way round.
1.6 Category 4 — steel: machine it, or find one
Every high-cycle, load-bearing, precision part in a teletype is hardened steel, and it is hardened steel because a century of engineering said so. Cams, levers, swords, code bars, pull bars, type bars, shafts, pawls, latches.
These must be steel. Not printed, not cast in resin, not “it’s only a small load.” A sword strikes an armature extension tens of times a second; a code bar takes a hammer blow from a pull bar every character. A polymer substitute will fail, and per the fatigue mechanism above it will fail suddenly, at speed, inside a mechanism full of other things it can jam or bend.
Your options, in order:
- Find the original. Parts machines, the dealers, Greenkeys, eBay. Genuinely the best answer, and the reason people buy rusty derelict machines and strip them.
- Machine a replacement. Many teletype parts are flat profiles in gauge steel — cut, filed, drilled, and hardened — and are entirely within reach of a hobbyist with a bench, a file, and patience. The parts manual gives you the shape; a working original gives you the dimensions. For flat parts, a printed drilling jig and careful filing will get you further than you think.
- Have it made. Waterjet, laser cutting, and wire EDM services will cut a flat steel profile from a drawing for surprisingly little, and a scanned parts-manual illustration plus one caliper session is enough to make that drawing.
- Repair rather than replace. A worn pivot hole can be bushed — drill oversize, press in a bushing, ream to size. This is a standard machine-repair technique, it is exactly what is done in typewriter restoration, and it restores a worn part to specification without making a new one. It is labour-intensive; it is also frequently the only option and it works.
And on hardening: if you make a part from mild steel where the original was hardened, it will work and then wear, quickly, and while wearing it will change the machine’s timing. If a part is a cam surface, a latch face, or anything that another part strikes, it needs the hardness. Simple oil-hardening tool steel (O1) and a propane torch will get an amateur further than they expect, and the Greenkeys list will tell you which parts genuinely need it.
1.7 The ethic
One last thing, because it comes up whenever anybody modifies a historic machine.
A teletype that runs is worth more than a teletype that is pristine and dead — to me, and I think to most people who keep these. These were working machines, maintained by technicians who replaced parts constantly and never thought twice. Fitting a modern spring or a printed spacer is not a betrayal; it is what the machine was designed for.
But be honest and be reversible. Keep the broken original in a labelled bag. Write down what you changed, and put the note inside the machine. Prefer a modification that can be undone. If you would be annoyed to discover somebody else had done it to a machine you bought, do not do it — and if you would only be annoyed at not knowing, then the fix is documentation, not abstinence.
Volume 2 is the other half of the problem: the parts that are not mechanical at all, where a modern substitute is not a compromise but a genuine improvement.
1.7.1 Sources (Vol 1)
- Parts and consumables sources — “Mr RTTY” for parts inventory and W2JC for new-old-stock supplies, both via the Greenkeys community; hand-cutting replacement rubber parts from sheet stock. David Stickelman, “Getting started with a teletype.” http://stickelman.net/index.php/2025/02/23/getting-started-with-a-teletype-my-consolidated-notes-on-restoration/
- 🔴 Platen recovering — J.J. Short Associates took over platen and roller recoating after Ames Supply Company closed in May 2012 after over a century serving the typewriter and office-equipment trade; they now also recover feed, bail and finger rollers; reported pricing roughly $60–$100 depending on platen size. https://www.jjshort.com/typewriter-platen-repair.php · background: https://munk.org/typecast/2012/07/29/update-typewriter-platen-refurbishing-by-j-j-short/ ⟨verify current pricing and turnaround directly — these figures date from the 2012 coverage⟩
- Fatigue in 3D-printed polymers — fatigue failure initiates at micro defects, voids and poorly bonded interfacial areas, propagating under sub-critical cyclic load to sudden catastrophic failure; polymers additionally fail thermally through hysteretic heating. “Fatigue behaviour of FDM-3D printed polymers…,” International Journal of Fatigue. https://www.sciencedirect.com/science/article/pii/S0142112320305399 · “A review of the fatigue behavior of 3D printed polymers,” Additive Manufacturing. https://www.sciencedirect.com/science/article/abs/pii/S2214860418308662
- The Model 28’s nylon drive gear and the 368 rpm main shaft at 60 WPM (from a 3600 rpm motor) — kb8ojh.net, “Teletype Model 28 KSR.” https://kb8ojh.net/station/teletype/ · see Inside the Teletype Mechanism, Vol 2.
- Precision bushing as a repair technique — pressing precision bushings into less precise parts is standard practice in vintage-machine restoration, described as labour intensive but effective. Discussion at The Filthy Platen, “Thoughts on 3D printing a typewriter.” https://filthyplaten.com/2014/04/04/thoughts-on-3d-printing-a-typewriter/
- ⚠ Spring tension specifications appear throughout the Teletype Adjustments and Lubrication bulletins, given as a force at a stated measuring point. Use them — see Restoring a Teletype, Vol 1 for how to find the right bulletin.
- Cross-links: Restoring a Teletype (both volumes); Inside the Teletype Mechanism (what each part actually does, which is how you judge its duty); Building Your Own Keys (the same fabricate-it-yourself instinct in brass).