Restoring a Teletype · Volume 1
Restoring a Teletype — Vol 1: Do Not Plug It In
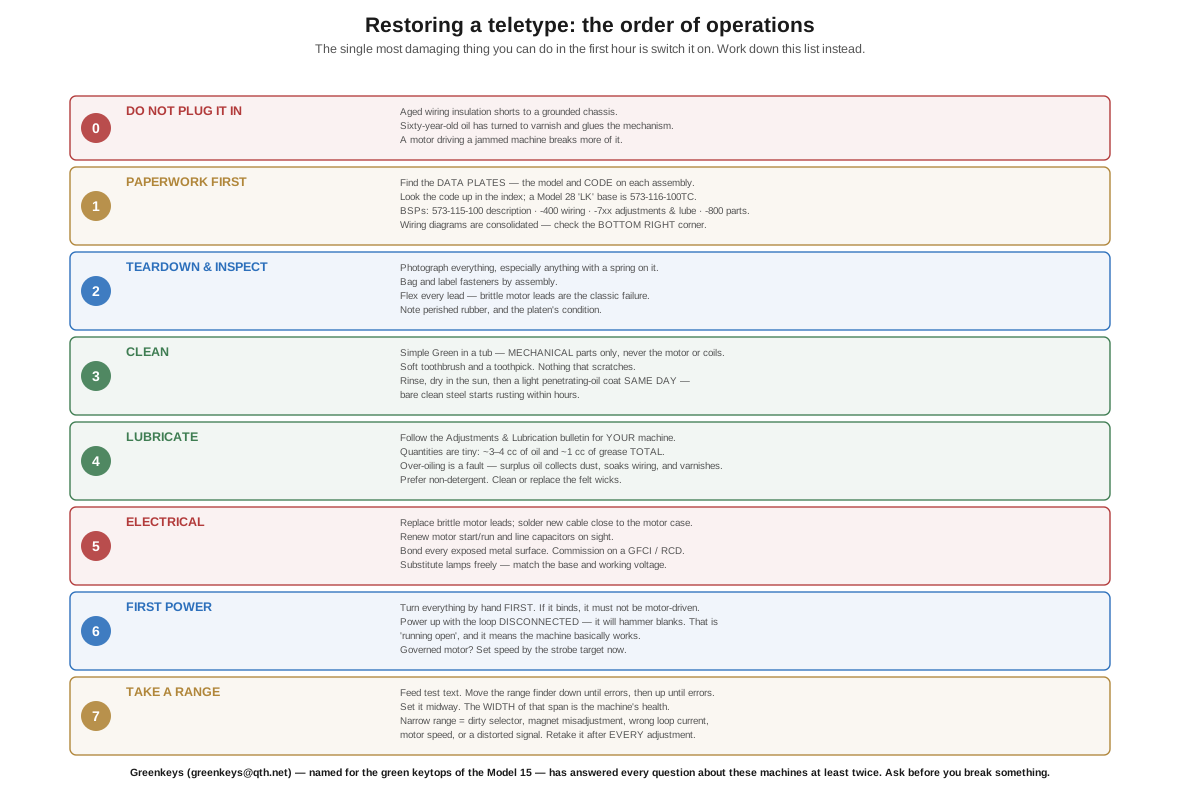
You have just got a Model 15 home. The single most damaging thing you can do in the next hour is switch it on. Here is the order of operations that keeps a seventy-year-old machine alive — starting with finding the right manual, which is harder than it sounds.
1.1 The temptation
It is in the back of the truck. It weighs more than you expected, it smells of old oil and ozone and something faintly like a library, and there is a power cord hanging off it. Everything in you wants to plug it in and see if it goes.
Don’t.
A teletype has been sitting somewhere for thirty or fifty years. In that time three things have happened to it, all invisible from the outside, and any one of them can turn “switch it on” into permanent damage:
- The wiring insulation has aged. Rubber and early plastics go hard and crack, and oil accelerates it. The classic failure is the motor’s own lead-in wires: brittle, oil-soaked, and shorting to the chassis. One restorer’s Model 28 tripped the GFCI every time from exactly this cause.
- The lubricant has turned to varnish. Sixty-year-old oil is not oil any more. It is a sticky brown lacquer that glues cams to shafts and holds levers where they should not be. Applying power to a mechanism that cannot move is how you strip a gear or burn out a motor.
- Something may be physically broken or out of adjustment, and a machine driven while jammed will break more.
The order of operations below is roughly the one that the Greenkeys community — the mailing list at greenkeys@qth.net, named for the green keytops of the Model 15 keyboard — will tell you if you ask, and they are, by consistent report, one of the most generous technical communities in the hobby. Ask before you break something. These people have been doing this for decades and there is no question about these machines they have not already answered twice.
1.2 Step one is paperwork
This surprises people, and it should not. These machines are magnificently documented — Teletype and the Bell System wrote adjustment procedures for every mechanism in every variant — and the challenge is not finding documentation but finding the right documentation, because each model family has many variants and the wrong bulletin will send you adjusting something your machine does not have.
Find the data plates first. Every major assembly — typing unit, keyboard/base, motor unit, electrical service unit — carries a plate with a model and a code on it. That code is the key to everything. A Model 28 KSR wall mount with an LK keyboard/base, for example, is documented by 573-116-100TC, and you find that by searching the document index for “LK”, not by searching for “Model 28.”
Where to look. The US Navy Radio Communications archive at navy-radio.com holds essentially the entire corpus, and despite the name it is not limited to Navy equipment — it covers the commercial and military lines both.
How the numbering works. A Greenkeys member summarised this better than I could, and it is worth reproducing:
Table 1 — How the numbering works. A Greenkeys member summarised this better than I could, and it is worth reproducing
| Document family | Contents |
|---|---|
| Teletype bulletins 0–999 | Description, theory, adjustments, lubrication (later issues are just indexes to the BSPs) |
| Teletype bulletins 1000+ | Parts manuals |
| Military manuals | Everything in one document — comprehensive, but often hard to navigate to the specific thing you want |
| BSPs (Bell System Practices) | The preferred source; structured and precise |
And the BSP structure for the Model 28 series, which shows the pattern:
  573-000-000    index of the 28 series
  573-115-100    description of the printer
  573-115-400    wiring diagrams
  573-115-7xx    adjustments and lubrication      ← the one you will live in
  573-115-800    parts
  873-116-xxx    keyboard, etc.
The last three digits wander for exceptions, so an unusual assembly may have its parts in an unexpected number. A TC suffix means Teletype Corporation issued the BSP directly rather than through the Bell System chain, and you will sometimes find both versions with slightly different dates.
For wiring diagrams specifically: Teletype consolidated several variants into single documents, so you must check the bottom right corner of each diagram to find the one matching your machine. Adjusting to the wrong diagram is a genuinely frustrating way to lose a weekend.
Print the adjustment-and-lubrication bulletin for your exact machine. You will refer to it constantly and you do not want to be scrolling a PDF with oily hands.
1.3 Step two: teardown and inspection
The Model 28 in particular is surprisingly easy to get apart — these were designed for field maintenance by technicians in a hurry, and the major assemblies come off with a handful of fasteners.
Take it down into its major units. Then look, before you clean anything:
- Wiring, everywhere. Flex each lead gently. If the insulation is brittle, crumbling, or shattered, note it. This is the single most likely thing to hurt you or the machine.
- The motor leads specifically. Aged and oil-saturated insulation right at the motor case is a known failure point on these machines.
- Rubber. Grommets, bumpers, motor mounts, feed rollers, the platen. Rubber is the least survivable material in the machine.
- Anything visibly broken, bent, or missing. Compare against the parts manual illustrations.
- The platen. If it has gone hard, glazed, or cracked, note it — but do not despair yet, and do not try to fix it now. Platens are a specialist job and they are covered in Making the Parts That No Longer Exist.
Photograph everything as you go. Especially anything with a spring on it. A teletype has a great many springs, several of which look alike and go in different places, and a photograph taken before disassembly is worth an hour of puzzling later. I would add: bag and label fasteners by assembly. They are not all the same.
1.4 Step three: cleaning
The consensus solvent, and it works well, is Simple Green degreaser.
The method that restorers report success with:
- Put the mechanical assemblies in a large plastic tub. Keep electrical items out — do not saturate the motor, the magnet coils, or anything with windings or contacts.
- Spray liberally and let it work on the varnished old oil.
- Soft-bristle toothbrush for stubborn dried lubricant. A toothpick for the really set-in grime in corners.
- Never use anything that will scratch. No wire brushes, no abrasives, no scrapers on bearing surfaces. These are precision parts and their finish is functional.
- Rinse thoroughly with water and set out to dry — in the sun if you have it.
- Immediately give everything a light coat of penetrating oil to prevent flash corrosion. Bare clean steel will start rusting within hours, and you have just removed every trace of protective oil from the entire machine.
That last step is not optional and the timing is not flexible. Wash it, dry it, oil it, same day.
The transformation is dramatic — a typing unit that looked like a lump of brown grease comes out looking like the machine shop it left. And it is worth doing thoroughly, because you cannot adjust a dirty machine. Every symptom you chase before cleaning may simply be dried lubricant, and you will have wasted the effort.
1.5 Step four: lubrication
Follow the adjustments-and-lubrication bulletin for your machine. It tells you every point, and there are a lot of them: felt pads, wicks, gears, bearings, cam surfaces, pivots.
Two things surprise people.
The quantities are tiny. One restorer’s Model 28 took approximately 3–4 cc of oil and 1 cc of grease across the entire machine. That is under a teaspoon of oil for a machine with hundreds of moving parts. Over-oiling is a real fault, not a harmless excess — surplus oil migrates, collects dust into a grinding paste, soaks into wiring insulation and accelerates its decay, and eventually varnishes into exactly the deposit you just spent a weekend removing. The original varnish in your machine got there because somebody was generous.
Choice of lubricant is debated, and non-detergent matters. Reported successful choices include 20-weight full synthetic motor oil and Lucas Red-N-Tacky grease; others use proper light machine oil and a silicone grease. The argument for non-detergent oil is that detergent packages degrade over time and leave deposits — the machine’s original specification would have been a non-detergent mineral oil. Detergent oil is used by plenty of people without disaster, but if you are choosing, choose non-detergent.
A word on the felts. Many lubrication points are felt wicks and pads that meter oil to a bearing slowly over months. If they are hard, black, and saturated with old varnish, they are no longer wicking. Cleaning or replacing them matters more than the oil you put on them, and they are trivially fabricated from sheet felt if you cannot buy the exact part.
Volume 2 is the electrical side — the wiring you flagged, the motor, the loop that makes it print — and the first character.
1.5.1 Sources (Vol 1)
- 🔴 Principal source: David Stickelman, “Getting started with a teletype, my consolidated notes on restoration” (23 Feb 2025) — the Greenkeys list at
greenkeys@qth.netand the origin of its name; the data-plate → code → document workflow (the LK keyboard/base →573-116-100TCexample); the Greenkeys member’s summary of bulletin 0–999 vs 1000+ vs military manuals vs BSPs, and the573-xxxBSP structure with the TC suffix note; checking the bottom-right corner of consolidated wiring diagrams; disassembly and inspection for brittle wiring and perished rubber; Simple Green, soft toothbrush, toothpick, no scratching, rinse, sun-dry, then penetrating oil; and machine oil plus silicone grease per the Adjustments and Lubrication bulletin. http://stickelman.net/index.php/2025/02/23/getting-started-with-a-teletype-my-consolidated-notes-on-restoration/ - Lubricant choice and quantities — 20-weight full synthetic motor oil and Lucas Red-N-Tacky grease; the non-detergent argument; approximately 3–4 cc of oil and 1 cc of grease total across the machine, distributed among felt pads, gears and bearings. kb8ojh.net, “Teletype Model 28 KSR.” https://kb8ojh.net/station/teletype/
- The motor lead insulation failure — insulation on the three motor lead-in wires becoming extremely brittle with age and possible oil saturation, shorting to chassis and tripping a GFCI. Same source.
- Document archive: US Navy Radio Communications, 1950s–1960s. https://navy-radio.com/ ⟨the site 403s automated fetching; browse it in a browser, or use the Internet Archive’s raw mirror for individual PDFs⟩
- ⚠ Cleaning and lubrication practice here is collected community experience, not a manufacturer specification. The manufacturer specification for your machine is in its own Adjustments and Lubrication bulletin, and it wins.
- Cross-links: Inside the Teletype Mechanism (what you are cleaning and why it matters); Restoring a Teletype Vol 2; Making the Parts That No Longer Exist (platens, rubber, felts).